Notary Seal Stamp Information
General Notary Stamp and Seal Information
What is a Notary seal?
Used broadly, a Notary seal is the impression made by the Notary’s ink stamp or paper-crimping embosser.
What is the Difference between a Notary Seal and a Notary Stamp?
The words seal and stamp are commonly used interchangeably. Some states use the word seal to refer to the impression of a Notary stamp and/or an embosser seal. However, most Notary supply companies use “Notary seal” to refer to a Notary embosser seal, and “stamp” to refer to an inked rubber Notary stamp.
Notary seal stamps are usually made of pre-inked or self-inking rubber. When stamped, Notary stamps leave an inked impression with the Notary Public’s state, commission number, and other identity-verifying information.
Each state has their own unique notary seal requirements. Some states require that a Notary stamp be round, or contain the state seal within the border of the impression.
Notary embosser seals are usually made of metal. Embossers make an impression by crimping or indenting the paper. Embossers create a dry, raised impression. Additionally, embosser seals almost always make a round impression.
California Seal Stamp Sample Impression

California Embosser Seal Sample Impression

Is it better to get a Notary stamp or an embosser?
Unless your state specifically requires an embosser seal, it is recommended that you get a stamp instead of an embosser. Stamps have much more general utility than an embosser, because their impression is photographically reproducible.
Can I use a Notary embosser instead of a stamp?
The answer depends on which state you are commissioned in, since Notary rules and regulations differ from state to state. Most likely, however, the answer is no. In Pennsylvania, for instance, an embosser seal can be used in addition to an inked rubber stamp; but using an embosser does not replace the requirement to use a stamp.
Notary Seal Stamp Usage Instructions
How to Use a Notary Stamp
1. First, make sure that your document is on a hard, flat surface.
2. Before notarizing a document, practice using your stamp on a scrap sheet of paper to make sure you’re getting a clear, and therefor legal, impression.
3. Place the stamp squarely on the document.
4. Hold your stamp with your thumb and fingers – using your palm can shift the stamp in mid-impression.
5. Press firmly down on the stamp, hold for one second, then release.
The impression should clearly show all alphanumeric characters, the stamp border, and the state seal, if applicable.

1. Make sure the stamp is unlocked.
2. Compress the stamp enough to access the ink cartridge on the back of the stamp.
3. Slide lock on the back of the stamp.
4. Grip ink cartridge using the grip zones, and pull the ink cartridge out.
5. Slide a new ink cartridge into place.

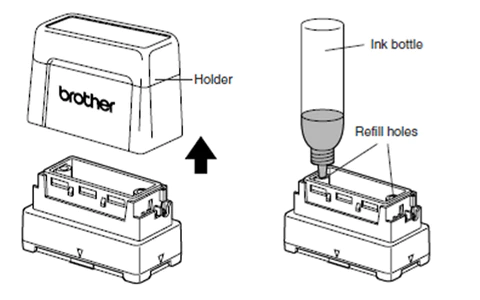
1. Remove the top of the stamp.
2. Use the ink bottle to add five drops of ink to each refill hole.
3. Put the top back on the stamp.
4. Immediately after refilling the ink, keep the stamp FACE DOWN until the ink begins to flow from the stamp.

1. Slide the ink cartridge out of the stamp.
2. Add 6 to 8 drops of MaxLight refill ink to the ink well.
3. Slide the ink cartridge back into the stamp and allow 1 hour for the ink to absorb.
If you see specks of dust or dirt on your stamp impression, you can easily clean your stamp.
Our preferred method is to take a Post-It and dab gently at the stamp.
If necessary, you can use rubbing alcohol on a paper towel to clean your stamp impression.
Notary Embosser Seal Usage Instructions
How To Assemble an Embosser Seal
1. Unlock the side locking mechanism.
2. Lift the seal handle.
3. Remove the die holder from the back of seal.
4. Squeeze the die holder together and slide it into the seal, making sure that the portion marked UP is facing upward.
5. Continue to push the die holder in until you hear it lock into position. You should feel a click.
- Squeeze down on the handle. Slide the button on the side of the handle UP to LOCK.
- Squeeze down on the handle. Slide the button on the side of the handle DOWN to UNLOCK.


